First venture into WebGL
The other day, I made this educational animation:
It took me on an unforeseen journey into the wonderful land of WebGL. Keep reading and I’ll give you a small guided tour.
First, a little bit about the animation itself. It tries to demonstrate, in ten seconds, that there exists a very symmetric way to cut up a cube into six parts. What’s more, each of these parts corresponds to a formula. For example, inside the part that I single out at the start of the animation, every point \((x,y,z)\) satisfies \(x<y<z\). Together, the six parts correspond to the six possible ways in which you can order the three dimensions.
This was something that occurred to me some years ago (while I was working in computer science research, and thinking about ways to order three probabilities). At that time, when I wanted to visualise something in 3D, I would resort to MATLAB, and while it must have been possible to do animations as well, I never took it that far. Presently, with some JavaScript development experience under my belt, I felt I should be able to do it in the browser.
So, which browser API and authoring library to use? I knew I was looking for a way to represent simple 3D objects, project them onto 2D, and animate their (dis)appearing and rotation, but I barely had any experience in this area. My first thought was doing them directly in SVG/CSS, but although you can do 3d matrix transformations that way, you still have to define the base objects in 2D, which feels cumbersome.
Hello three.js
Looking around a bit, I bumped into three.js which seemed to provide exactly the high-level API I needed (although you can see from the demos that it can do much, much more). The browser API it depends on is WebGL, a JavaScript binding for OpenGL. OpenGL itself is a cross-platform API for rendering 3D graphics using the hardware acceleration of the device’s GPU.
Three.js provides a layer over WebGL at the following level of abstraction:
const geometry = new THREE.BoxGeometry(1, 1, 1);
const material = new THREE.MeshStandardMaterial({
  color: 0xff0000,
  transparent:true,
  opacity:0.6,
  side:THREE.DoubleSide,
});
const cube = new THREE.Mesh(geometry, material);

const light = new THREE.SpotLight(0xffffff, 30, 5, Math.PI/2, 0);
light.position.set(2, 1.5, 0);

const scene = new THREE.Scene();
scene.background = new THREE.Color( 0xffffff );
scene.add(cube, light);

const camera = new THREE.PerspectiveCamera(55, width/height, 0.1, 1000);
camera.position.set(1, 1.1, 1.3);
camera.lookAt(0, 0, 0);

renderer.render(scene,camera);
What’s happening in this code? First, I define a cube shape (geometry) with dimensions 1 by 1 by 1. To construct a displayable object, you have to combine the geometry with a material. The material determines the looks of the shape (for example, its color).
Next, I define:
- a light source (with certain light strength and direction)
- a scene, grouping cube and light source, and adding some background color
- a camera, defining position and perspective from which we view the scene
Together, this produces the following picture:
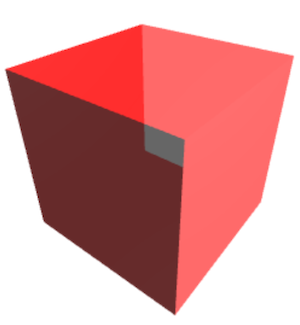
Yes, it’s a cube, but it’s not really attractive, although it already cost me quite some effort to tweak the parameters. For example, it took me a while to find out that, for transparency to be useful, I also had to configure the material to also render the back side of the cube faces. This maybe should have been a good point for me to stop and look for a simpler library, but… well, you know how it is with invested effort. After adding some lights and even more parameter tweaking I ended up with semi-transparent blocks that looked acceptable to me.
On to the second challenge then: drawing a wireframe for the cube which has dashed lines for edges on the back. This is not something that is provided out of the box by three.js, which by now I recognized is good at making objects look realistic but not really built for stylized line diagrams. I needed to implement my own material which renders as dashed lines when seen “from the inside” and solid lines when seen “from the outside”.
Shaders
Fortunately, implementing a material is a cool thing to do, because you get to write code that runs on the GPU. OpenGL has a special language for this called GLSL: OpenGL Shading Language. “Shading” at first sounded to me like very specific functionality (calculating the effect of light and shadows on a material, maybe?) but it turns out that everything you run on the GPU is called a shader. Shaders are mini-programs that define a transformation on one data point and can be executed in parallel for a lot of data points. They are assembled into a (mostly pre-defined) pipeline. The input for this pipeline are the high-level 3D object vertices, faces and edges, light and camera positions, material parameters etc.; the output is a color value for every 2D pixel.
This is the vertex shader for my conditionally-dashed material:
attribute float dist;
attribute vec3 normal1;
attribute vec3 normal2;
varying float vdist;

void main() {
  float in1 = dot(normal1,cameraPosition);
  float in2 = dot(normal2,cameraPosition);
  vdist = (in1>0.0 || in2>0.0)? 0.0 : dist;
  gl_Position = projectionMatrix * modelViewMatrix * vec4(position,1.0);
}
It is run twice for every edge of my cube: once for the vertex at one end, which
I defined (elsewhere) to have dist=0.0, and once for the vertex at the other end
which has dist=20.0. This is one of the input attributes that get passed from the
JavaScript code into the shader for each vertex. The others are normal1 and normal2
– the 3D normal vectors of the faces adjacent to the edge, also defined elsewhere –
and finally position, the 3D position of the vertex. You can see the attributes declared at the top of
the shader, except for position, whose declaration is included automatically
by three.js.
The output of this shader consists of the variables vdist (explicitly declared)
and gl_Position (again, included by default). The latter represents the 2D
position of the vertex on the screen, and is derived from the 3D position by transforming
it into the camera’s frame of reference (premultiplying it with the so called model-view matrix)
followed by the camera’s projection, another matrix multiplication. This is a widely used
practice you can read more about in
this tutorial.
The custom vdist output signifies whether the line should be dashed (vdist=20.0) or solid
(vdist=0.0). I determine this by comparing the angle at which the camera looks at
the edge to the two normal vectors. If the dot product of the camera vector and
either one of the normals is positive, this means the camera is looking at the front
of this face, and the line should be solid.
The outputs of the vertex shader are passed to the next step in the pipeline, which
transforms the two vertices into a line by interpolation. It generates all the pixel
positions between the two values of gl_Position and, crucially, interpolates vdist
between its to values as well (this is what its varying declaration means). This
interpolation step is predefined, but its results are passed into the fragment shader
that I wrote myself:
varying float vdist;
void main() {
  float opacity = mod(vdist+1.0,3.0)<1.0 ? 0.0 : 1.0;
  gl_FragColor = vec4(0.0,0.0,0.0,opacity);
}
It specifies the color and opacity for each generated pixel in the 4-element output
vector gl_FragColor.
The color is black (RGB 0/0/0) everywhere, but the opacity depends on the vdist input.
Using the mod function, it makes 1/3 of the pixels transparent – except when the
vdist value is 0 for the entire line, in which case it’s opaque everywhere.
Animation
With the rendering of the colored blocks and the cube wireframe done, the next step was to animate them. This also required more work than I thought; I’ll only give the summary in this post. Although three.js does have an animation framework, I didn’t really look into it. I had already fallen in love with the JavaScript notebook environment Observable, and knew that it was capable to make the 3D scene react to UI controls in the notebook and to an automatic animation script as well.
In the end it took quite some lines of code, but this is partly because I couldn’t stop until I had smooth movement (using easing functions), text animation effects (using CSS), my own animation control, and a (poor man’s) responsive layout. All of this can be viewed and live-edited at Observable.
As you may have read between the lines, the intention to make a simple animation kicked off quite the learning process for me, but I know basic WebGL now! 🎉 If you want to dive into it yourself, the three.js tutorial gives you a good starting point for quickly getting something to play with on your screen. For a deeper understanding of what’s going on (including GLSL), check out Learn WebGL. Some mind-blowing fragment shader techniques for creating beauty out of pure math are found in The Book of Shaders. The thing I myself would like to examine next is REGL, an alternative abstraction over WebGL.